Miter saws are one of the most powerful and useful power saws out there. From woodworking to metal-cutting, it’s an essential power saw to keep at your disposal. But can you cut ABS with a miter saw?
Miter saws can cut through plastic just as easily as they can cut through hardwood or plywood. In fact, they are the best saws for cutting ABS pipes apart from hacksaws. In terms of efficiency, miter saws provide more functionalities than hacksaws due to motor power & the miter gauge.
Today, I’ll note down the key guidelines for using miter saws on ABS pipes for easy and casualty-free cutting sessions. Keep reading to find out the necessary tips and tricks regarding miter saws to finish the DIY jobs effectively.

What’s ABS?
ABS pipes are similar to PVC pipes in terms of structural integrity. Like PVC pipes, they’re mostly used in household and residential construction. They’re often a good alternative to PVC pipes due to cost-effectiveness, but not longevity.
The full form of ABS is Acrylonitrile Butadiene Styrene. PVC, on the other hand, refers to Poly Vinyl Chloride. Almost in every case, you can easily replace PVC pipes with ABS ones.
ABS pipes are generally harder, sturdier, and not as lightweight as PVC pipes. They’re mostly used for drain fixtures, waste disposal fixtures, electronic insulation, etc.
You can find narrow ABS pipes with just 1-1.5 inches of diameter for construction purposes. Again, the width can go up to 4 inches if you require better and constant flow.
And yes, miter saws can easily adapt to these measurements since they’re dedicated power saws for cutting across the grain.
But here’s the kryptonite of ABS pipes.
They’re mostly only good for indoor or underground purposes. The plastic molecular synergy is not as strong in ABS pipes, unlike PVC pipes.
Hence, the polymer bonds often start to dissociate, if exposed to direct sunlight/heat for a long time. And once they start to corrode, the material becomes toxic to an extent. As such, it becomes somewhat unsafe to transport water, wastage, etc.
But other than that, ABS pipes have all the advantages in a strictly cold temperature environment. They’re sturdy and extremely durable when not degraded by direct sunlight.
Cutting ABS Pipes With A Miter Saw: Step-By-Step Guide
Now that you know the basics of miter saws, it’s time to find out how to cut ABS pipes with a miter saw. I’ve prepared a detailed step-by-step guide to help you guys with the process.
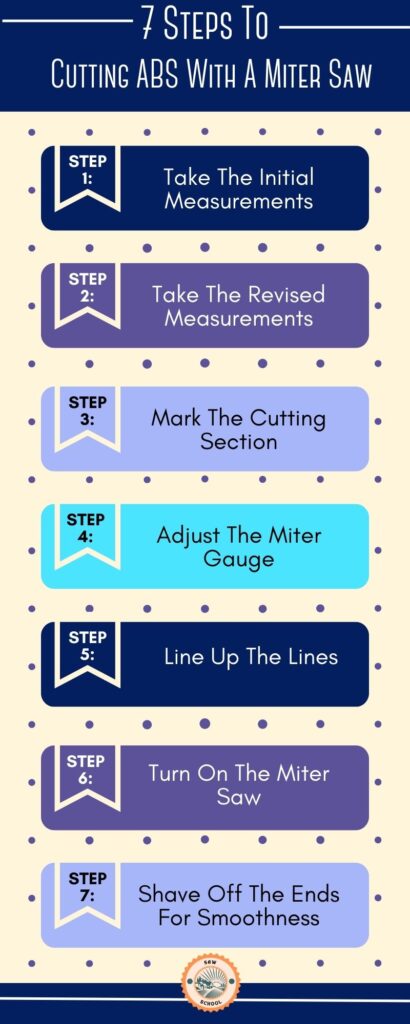
Step 1: Take The Initial Measurements
Take the pipe that you wish to cut through and take proper measurements with a scale or similar alternatives. While measuring, you should include the kerf measurements too.
But, what’s kerf and how do you measure it?
The kerf section denotes the cutting section i.e. the part through which the circular blade will go through. Now, the blade itself has a certain width to it, right?
You’re supposed to include that width in your initial measurements if you want to get proportional portions later. For instance – imagine that you’re cutting a 12-inch pipe.
As a simpleton, you’ll want to measure from one end and place a mark at the 6-inch point. But here’s the thing.
Let’s say that the blade itself has a width of 0.25 inches. Hence, when you’ll cut right down to the 6-inch mark, you’ll have two pieces of unequal magnitudes.
One of the pieces will have 6 inches, but the other one will have (6-0.25), or, 5.75 inches. And thus, if you planned to adjoin these pieces perfectly with other pipeline sections, you’ll find that the latter piece is way shorter.
This extra measurement right here is known as the kerf. And it’s important to include the kerf measurements if you want to get equal pieces after cutting the ABS pipes.
Step 2: Take The Revised Measurements
After taking the initial linear measurements, it’s time to calculate the revised measurements. Let’s say that you want to cut a 12-inch pipe into four equal sections.
Then you’ll have to include the kerf measurement for every cutting section separately. You have to acknowledge that – you’ll not get 4 equal sections containing 3-inch each.
After deducting the kerf section, you’ll be left with a little less than 3-inch per section. Let’s do the math.
This time, let’s work with a blade with a width of ⅛ of an inch. Or, 0.125 inches, to be exact.
Let’s also divide the cutting procedure into two steps to deduce the measurements faster. In the first step, we’ll cut the 12-inch pipe into two equal sections.
Deduct the blade width from the total length. You’ll be left with (12-0.125) i.e. 11.875 inches. Now divide the new total length by 2 to get the accurate lengths of new pieces.
After dividing, you’ll get 5.9375 inches in each section.
Now, you’ll need to equally cut these pieces in half again to get four equal pipe sections. Follow the aforementioned procedure step-by-step to get the final measurements.
After deducting the kerf from the 5.9375-inch section, you’ll be left with (5.9375-0.125) i.e. 5.8125 inches. Dividing the new length by 2 will give you around 2.90625 inches.
Do you see the difference?
You were supposed to get 3 inches of pipe sections by cutting a 12-inch pipe into 4 equal parts. But by accurately measuring, i.e. by including the kerf measurements, you now know that you’ll get around 2.9-inches maximum.
The differences may not seem like much. And it’s also true that seasoned sawists end up playing it by the ear in most cases and don’t even go into such detailed calculations.
However, that doesn’t mean you should disregard the kerf measurements entirely. Because, without that, you’ll be left with unequal pieces from the very beginning and you won’t even be able to tell where you went wrong.
Step 3 – Mark The Cutting Section
After getting through all the tiresome calculations, use a marker or a pencil to mark the spots you want to cut through. Make sure to mark according to the revised measurements.
For instance – don’t place a mark after every 3 inches in the example in the previous step. Place the mark after every 2.90 inches instead. After every 2.90 mark, keep a gap of 0.125 inches before measuring the next 2.90 inches. Otherwise, there won’t be any differences.
[The magnitudes above reflect the calculations of the aforementioned kerf measurements in Step 2]
Try to follow the accurate measurements as much as possible even if it feels like overkill.
Step 4 – Adjust The Miter Gauge
After the linear calculations, it’s time to get to the angular calculations. Normally, pipes are always cut perpendicularly. You almost never need to cut them at a different angle.
In some cases, a 45° cut is needed for making pipe adjoins. Whichever the case, adjust the miter gauge to get the perfect angles. Keep the fence over the 90° mark if you want a strictly perpendicular cut and tighten the knobs.
Again, rotate the fence towards the 45° side and tighten the settings if you want an oblique cut. Make sure to recheck the locking handle before moving on with the next steps. You don’t want the pipe to go off-angle after triggering the blade.
Step 5 – Line Up The Lines
Don’t turn the miter saw right away after fixing the gauge. Take control of the handle and bring down the steady blade over the marks denoting the cutting sections.
Use your other hand to adjust the pipe in a way that the blade lines up with marked spots thoroughly. Do Not press the trigger by the handle until you have lined up these lines.
Step 6 – Turn On The Miter Saw
After lining up the blade with the pipe marks turn on the miter saw and wait until the blade reaches full speed. Keep the blade right above the pipe until it does so.
Once it starts to rotate uniformly, steadily cut through the marked sections in one clean sweep. Bring the blade right back up once you’ve cut through the pipes entirely.
Similarly, if you need to cut through more sections, use the other hand to position the pipes like before. Always keep the dominant handle over the handle while changing positions.
Step 7 – Shave Off The Ends For Smoothness
The initial cuts will feel a little wobbly and rough at times. So, take the separated sections and slowly place them by the blade (not under the blade) to shave off the handles.
This way, the side of the blade will act like a polisher and shave off the rough edges. However, this takes a little bit of experience to do properly.
So if you’re unsure of smoothening the edges like this, don’t. Simply use sandpaper or polishing surfaces on utility knives to file the edges until they become smooth enough.
Cutting ABS Pipes With A Miter Saw: Precautions
Lastly, let’s go over a few precautions which you must follow while operating powerful miter saws –
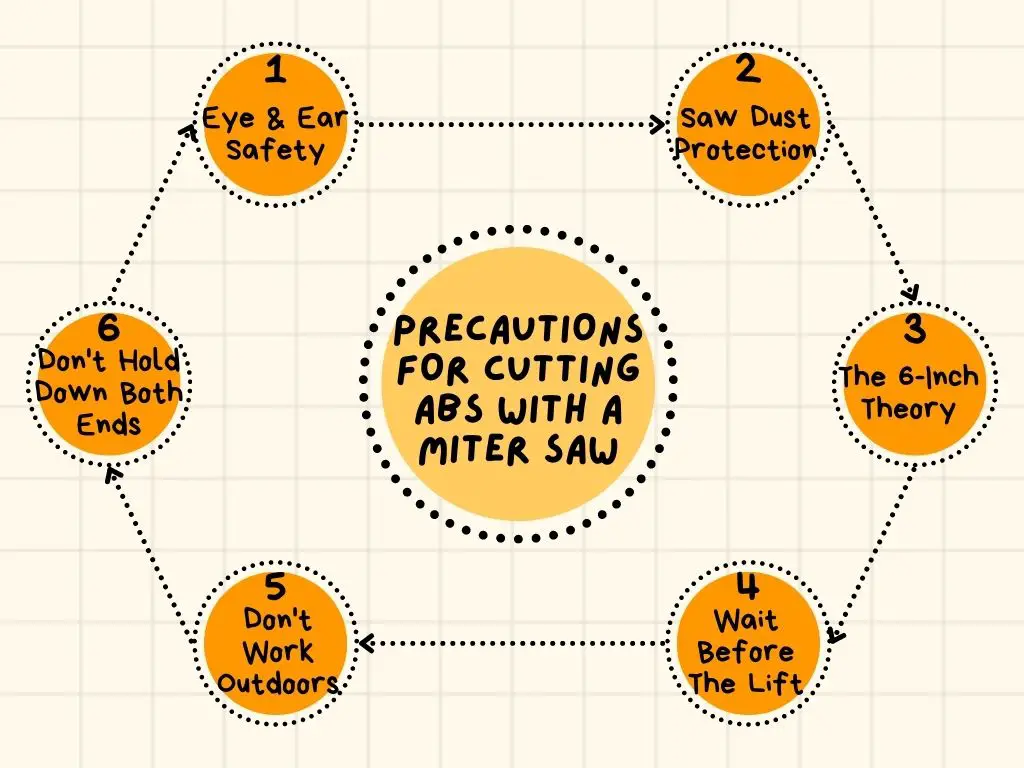
1. Eye & Ear Safety
As mentioned above, sawdust particles, especially molecular plastic particles, are super harmful to our bodies. Hence, you should use proper gloves, eyeglasses, and earmuffs or work helmets before operating a miter saw.
2. Saw Dust Protection
It’s recommended to cut plastic pipes within a vacuum box. Because unlike wood particles, which are simply carbon, ABS particles are low-grade plastic.
If they come into contact with high-temperature areas, they’ll melt, unlike carbon, which will get oxidized to an extent. Hence, it’s tricky to get rid of plastic particles. The fumes are extra harmful and can cause significant respiratory diseases.
So, if you’re performing the deed inside a safe vacuum box, it’ll be easier to collect all the particles together later on. Furthermore, it’ll prevent the mixture of wood and plastic particles for easy disposal afterward.
3. The 6-Inch Theory
Like many other things in life, always follow the 6-inch theory while cutting ABS pipes with miter saws. While cutting through the pipes, make sure your upper body is at least 6 inches away from the fence and the blade itself.
4. Wait Before The Lift
Always wait for the blade to come to a complete stop before lifting it up and letting go of the handle. If needed, watch the blade wind down like an eagle.
Most miter saw accidents happen during this phase. Some of the residual splinters can still hit your face while you’re lifting it up and aiming it upwards. So, let it stop completely before shifting to a different phase of the work procedure.
5. Don’t Work Outdoors
You shouldn’t use a miter saw to cut ABS pipes outdoors for not one but two different reasons. Firstly, ABS pipes do not have a good relationship with direct sunlight.So, it’s best to keep away from the sun or high-temperature areas while cutting or working with ABS pipes.
And secondly, it’s harder to accumulate all the sawdust if you’re working out in the gardens or lawns.A garage or a controlled tool shed is the best place for operating miter saws with the least amount of casualties.
6. Don’t Hold Down Both Ends
With miter saws, you don’t usually use lengthy pipes. Hence, it’s often a simple one-person job.
You won’t need someone else to hold down the handle while you hold down the board itself. If you’re right-handed, then use your left hand to hold down the left end, and the right hand to control the handle and the trigger.
Similarly, if you’re a left-handed person, do the opposite. Keep the handle in the jurisdiction of your left hand and hold down the pipe with your right hand. Basically, use your dominant hand to control the positioning of the blade.
Because controlling the blade is the most important part of the cutting process. Miter saws mostly deal with lightweight and soft pieces. So, you can easily keep the pieces/pipes in place with your non-dominant hand.
Final Word
Whew, I certainly did end up explaining one too many concepts in today’s article on cutting ABS with miter saws. But I do hope the detailed overviews helped you to get an answer to the infamous ‘can I cut ABS with a miter saw’ question.
Chopping through plastic is just as easy as chopping through wood with the help of miter saws. As a fellow DIY enthusiast, I’d highly recommend keeping a miter saw in your tool shed for the sudden pipeline reconstruction works. However, make sure to exercise proper precautions and put on masks to prevent inhalation of toxic ABS particles.
References:
3. DIY Chatroom
4. hunker.com
5. MT Copeland
