Hand-held saws are great, but they do involve the risks of shoddy craftsmanship. Hence, while many prefer hacksaws, hand-held pipe cutters, etc., for fixing PVC pipelines around the house, others look for power saws like miter saws instead.But can you use your miter saw to cut PVC pipes?
Miter saws aren’t a bad alternative to traditional pipe cutters if you want to cut down some PVC pipes. With just the perfect blade, they’ll cut down these pipes like butter. However, miter saws aren’t optimal saws for small pipes since there’s hardly any space left to clamp the sides firmly.
But hey, let’s get to the do’s and don’ts later. For now, let me first help you figure out what’s the right (and safest) way to cut down PVC pipes with a miter saw. So, hang tight!

How I Use My Miter Saw To Cut PVC Pipes?
I’ve previously included detailed step-by-step instructions for cutting ABS pipes with miter saws. Let’s do the same for PVC pipes as well. That way, you can compare between and look through the two for some of the preexisting similarities –
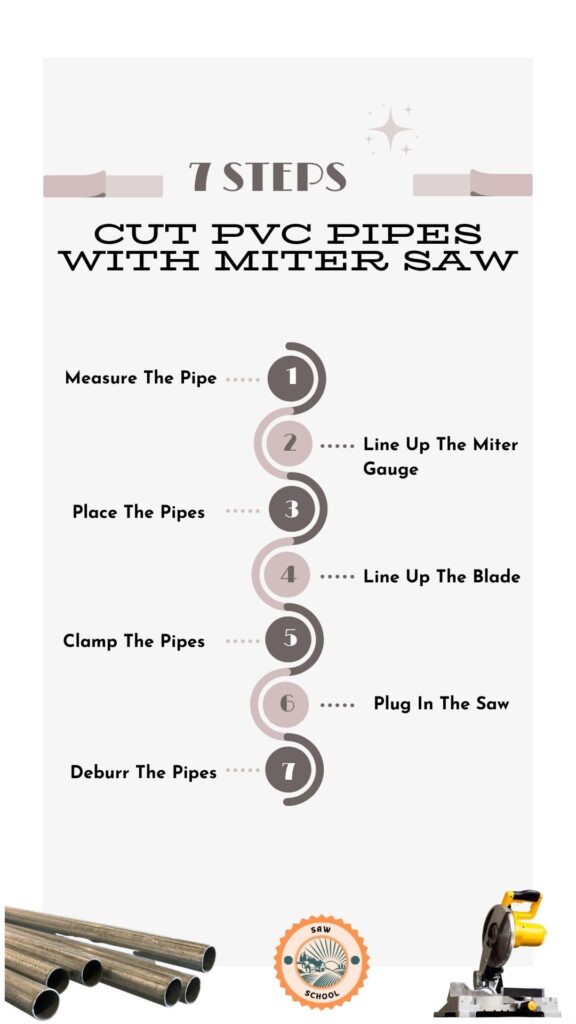
Step 1: Measure The Pipe
Take out your marking pencils and tapes to measure the length and width of the PVC pipe. Although, the width isn’t of the utmost importance here as the length.
Later during the procedure, you will need to clamp down the pipes to fasten them for power sawing. To clamp the pipes, there should be substantial space on both sides.
Again, if the pipe’s a little short, you can clamp only one side if needed to keep the pipe stable while sawing. But if you can’t even clamp a single side, then that pipe’s automatically not eligible for miter saws, unfortunately.
So, while measuring the pipes, make sure to find out whether the pipe is long enough to be eligible for clamping. Depending on the size of the miter saw itself, the measurement requirements can be a little high or a little low. So, make sure to take that into account as well.
Step 2: Line Up The Miter Gauge
Do you want a straight cut or a 45° cut for PVC pipes? There are hardly any instances where you’d want anything but a straightforward perpendicular cut here. But even then, based on your requirements, adjust the miter gauge accurately to get the desired straight or angled cut.
This is a very important step since a slight deflection might end up ruining the pipe altogether. You won’t be able to easily join two non-straight pipe sections with each other later. Hence, you’ll likely have to discard both sections entirely.
Tips:
“You can sometimes use deburring tools and hacksaws to shave off the excess plastic to get a straight cut. The pipe sections won’t have the desired length as before. However, they’ll now have a straight cut, and you can potentially use them for other projects involving short pipes.”
Getting back to the original guide, make sure to affirm the positioning of the miter gauge. Then, tighten the screws between the fence and the gauge for calculated positioning.
Step 3: Place The Pipes
Provided that your pipe isn’t short enough, place it on the fence to prepare it for sawing. There are a few tricks involved in this step that can help out in the long run.
Such as – if you’re cutting down a longer pipe into shorter sections, then it’s best to cut from a side. As in, don’t cut down the middle first, and then keep repeating the process. Instead, you should mark the sections in advance and keep cutting them off from one of the sides.
But what will you achieve by doing that?
Well, for one, the kerf measurement can become an issue if you keep cutting down the middle. Because a specific portion of the pipe will get destroyed completely while sawing, right? So, if you want four equal sections from a 12-inch pipe, and then cut down the middle to achieve those, it won’t work out.
The end pieces will, at best, have 3.90-inches or less to them. And most often than not, you won’t even get equal sections throughout the pipe since you won’t realize the discrepancies while blindly cutting down the middle.
Hence, it’s a good idea to cut from one specific side generally. That way, even if you get a wrong cut, at least the entire pipe won’t be compromised now.
And you can easily rectify the calculations and use the rest of the pipe for desired cuts. So, if you’re shortening a long pipe and require precise cuts, start from the end & not the middle.
Step 4: Line Up The Blade
After marking the lines on the pipe, you should place the lined-up sections under the blade. Then you should bring the unplugged blade down to match the lines to the blade.
I always do this to make sure I won’t accidentally cut any of the unmarked portions of the pipe. And it’s generally a great idea to line up in advance. Because once the blade is plugged in and the pipe is clamped, you won’t get too many chances to change the positioning of the pipes.
Step 5: Clamp The Pipes
You can use clamps of different sizes to tie down the pipes to the fence so that they won’t change their position. Before clamping the pipes, recheck the miter gauge, the beveled gauge, the fence and workbench stability, etc.
If you’re working with a long pipe, then clamp the pipes on one side only since you’ll cut down close to the other end. Again, if you’re cutting down the middle, then you should use two clamps on two sides separately.
By doing so, you can reduce the chances of vibrations during the procedure. Unwanted vibrations cause a lot of burrs, and you’ll likely not have clean enough cuts afterward. Hence, it’s best to just use two clamps to reduce the possibilities entirely.
Step 6: Plug In The Saw
Never plug in the saw until you’ve gone through the previous steps and everything’s in the proper place. The blade should stay right above the marked lines on the PVC pipes.
Allow the blade to reach maximum speed before you proceed to saw through the pipe. Then slowly and gently push it down and watch it cut the pipe into two sections.
Don’t keep the blade running within the pipe even when you’ve already achieved a clean straight cut. Because the blade will continue to take more and more plastic off.
Gently bring the blade to the initial position right above the pipe and trigger the switch to turn it off.
Let the blade wind down and become completely stable before you raise it even further. Remember – it’s never a good idea to let a running blade come close to your face.
Step 7: Deburr The Pipes
Some use the running miter blade itself to shape the diameter of the PVC pipes. If you don’t feel proficient enough to do that, you should use specialized deburring tools instead.
I use the No products found. deburring tool a lot for my pipe fixtures if I’m using a miter saw. In my experience, it’s one of the most cost-effective options on the market.
It’s perfect for removing burrs on pipes with a diameter of ⅛-inch to 1.⅝- inches. Plus, the body is plastic itself, which allows you to have a more stable grip on the pipe.
Cutting PVC Pipes With A Miter Saw: Advantages
I’m sure you’re tired of hearing why miter saws aren’t the best saws for cutting pipes. So, here’s a rundown of some of the advantages of cutting PVC pipes with a miter saw instead.
Efficiency
It’s undoubtedly safer to cut plastic pipes like PVC with hand-held saws like hacksaws. However, the manual cutting procedure also takes an awful amount of time.
Again, let’s take a pipe cutter, for instance. Imagine it takes you around 3-4 minutes to reach completion, provided that there are no interruptions or external complications.
In the same situation, it’d take a miter saw less than half a minute to cut through a pipe of the same diameter.
And in 3-4 minutes, you’ll do at least 8-9 times the work compared to that of a hacksaw. Way more efficient, right?
But yes, with hacksaws, you have a lot more control due to the manual operation. And you can take the time to get perfectly clean cuts. On the other hand, it’s harder to operate power saws on PVC pipes or any sort of plastic/metal if you aren’t proficient enough in using it in woodworking projects.
Plus, between clamping the pipes, switching the sections, deburring, etc., miter saws eat up a lot of time as well. However, if you know what to do and when to do and how to do it, you can use miter saws to avail maximum efficiency.
Clean Cuts
With hacksaws or pipe cutters, it’s not always possible to get absolute clean cuts, especially if you’ve shaky hands. Additionally, with the slightest change in motion, you can leave large dents within the gap while cutting.
Miter saws, on the other hand, can provide squeaky clean cuts in these cases. Since the blade is restricted in its position, and the pipe is strictly clamped on both sides (or one), neither of them has any opportunity to shift to a different position.
Hence, when the blade comes down, it’ll cut through like butter and divide the pipe into two sections. Again, miter saws produce lots of wood dust and hazardous wood and metal chips/flecks while sawing.
But due to the soft nature of PVC plastic, the saw doesn’t produce that many physical hazardous particles. As in, the plastic flecks can hardly penetrate through your skin or scratch it if accidentally exposed to them while sawing pipes.
Miter saws are one of the best power saws for PVC pipes if you want clean cuts with the least amount of effort & flecks.
Miter Saws Vs. PVC Pipes: Safety Hazards

Safety comes first, always, and forever. Miter saws are incredibly powerful and become even more of a beast when you’re using metal or plastic-specific blades instead of wood. So, it’s beyond important to keep your eyes open to notice all possible safety hazards while cutting PVC with a miter saw.
In all my years of trying out different methodologies, I’ve found the following issues as the most prominent ones. Overviewing these, you, too, can develop a keen ability to sense the green and red flags during the cutting procedure!
Proper Outfit
If you’re cutting plastic with a power saw, then you should dress for the occasion. Wear laboratory-grade eyeglasses to protect your eyes. You can also wear a mechanic helmet to protect your face entirely. Use thick gloves to protect your hands while sawing.
Plastic flecks are ultra-harmful to human lungs. So, try your absolute best not to accidentally inhale any of the sawdust afterward. Use medical masks if needed.
Higher TPI
Do not use the same blade that you cut wood with to cut PVC pipes. PVC is a softer but sturdier material and requires fine calibration to preserve the edges.
Get blades with a considerably high TPI (teeth per inch) count to ensure precise sawing. Read up on the types of saws to find out about circular blades and how TPI count changes the performance intricacy of different saws.
Combined Material
Always use carbide-tipped blades for PVC or ABS pipes, as they’re coordinated enough to penetrate through the plastic. The blade material itself should consist of industry-grade reforged steel, aluminum, etc., for enhanced functionality.
Sand The Edges
Even after deburring with a specific tool, you should still go for the old-fashioned sandpaper route for extra smoothness. As much I love my deburring tools, sanding the edges afterward always gives an extra nice touch to the pipe edges.
However, you shouldn’t use sandpaper if you’re cutting through decorative PVC plastic. Normally, PVC pipes are used for sewer and drainage fixtures throughout the house. Unlike the ABS pipes, they have higher heat resistance and hence, are often used outdoors as well.
In these cases, furniture-grade PVC is used to add to landscape-decorative factors. Sandpaper does not go well with these pipes since they leave friction marks on the top. Hence, only sand the edges of PVC pipes used for internal plumbing systems as looks don’t quite matter there.
Final Word
So, can you use your miter saw to cut PVC pipes?
The answer is yes if you want to cut through a large number of PVC pipes in a comparatively short time.
As long as you’ve got the right blade and on-point technique, power miter saws are an incredible tool for PVC pipes. However, in the first few attempts, you should take the time to learn and understand the technique properly.
You should also practice clamping the pipes on and off a lot to enhance your efficiency & safety while sawing later. Lastly, never use a miter saw to cut pipes too short to even clamp on a single side. And under no circumstances use your own hand to hold down the pipes.
